Thing which seemed very Thingish inside you is quite different when it gets out into the open and has other people looking at it

Saturday, September 24, 2011

Extracting RDF Data using WSO2 Data Services. (How to extract aircraft information from NASA rdf data sources)

In my last post I explained how to expose your data in cloud as RDF resources. Today I am going to explain how we can query RDF resources on the web/cloud and expose extracted data as a service. First of all as usual to expose our data as a service we need to create a data service using wso2 data services server.

To demonstrate RDF data extraction I am going to use a popular RDF data source which stores interesting information about NASA aircraft details. And we are going to extract aircraft information according to the agency. Following diagram shows how NASA keep their aircraft information as a data source.


If you click on RDF/XML on the top right hand side corner link you can view the RDF source of the the data.


To create data services you need to either download and install wso2 data services server or you can straight away create data services using Stratoslive cloud platform.

Once you login to data services server, click on create under Web Services -> Data Services -> add. Give an appropriate name and click on next.

Once you login to data services server, click on create under Web Services -> Data Services -> add. Give an appropriate name and click on next.

Then you need to create an RDF data source using our NASA rdf datasource. Give the DataSource Id, Data Source Type, and RDF File Location.

RDF File Location - http://nasa.dataincubator.org/~search.rdf?query=all


Click on next and create new query to create a new query. In order to query RDF data we need to write queries using SPARQL query language which is similar to SQL.The following SPARQL query is used to extract aircraft information

PREFIX space: <http://purl.org/net/schemas/space/> 

PREFIX relevance: <http://a9.com/-/opensearch/extensions/relevance/1.0/>

PREFIX foaf: <http://xmlns.com/foaf/0.1/>

PREFIX dc: <http://purl.org/dc/elements/1.1/>

SELECT ?homepage ?name ?alternateName ?internationalDesignator ?mass ?score ?launch ?agency ?description

WHERE {

?craft foaf:homepage ?homepage.

?craft foaf:name ?name.

?craft space:alternateName ?alternateName.

?craft space:internationalDesignator ?internationalDesignator.

?craft space:mass ?mass.

?craft relevance:score ?score.

?craft space:launch ?launch.

?craft space:agency ?agency.

?craft dc:description ?description.

}

Click on add Input mapping to give input mapping parameters. Since we are going to give agency as a input parameter we need to specify it in our rdfQuery. And go to main configuration.

Give the Query information and the SPARQL query as shown below.

Now we need to arrange how we display the results in the Results (output mapping section).

  • Output type – xml
  • Grouped by element - Aircrafts
  • Row name – Aircraft

Click on add new output mappings to add output mapping elements. Give the mapping type, output field name and data source column name as shown in the table below.

Mapping TypeData Source TypeData Source Column Name
elementhomepagehomepage
elementnamename
elementalternateNamealternateName
elementinternationalDesignatorinternationalDesignator
elementmassmass
elementscorescore
elementlaunchlaunch
elementagencyagency
elementdescriptiondescription


Click on save to save the query. Now we'l add an operation to get our extracted data called getAircrafts. Click next -> add New Operation. And give the query name and the operation name. Click on finish to finish creating the data service.

Click on finish to deploy the data service. Once you click on finish you can see your deployed data service under service list as shown below.

To try this service click on our try-it feature. Lets test our service by giving “United States” as the input of our service. You can see we can get all the aircraft details coming from United States agency.

Friday, September 23, 2011

Expose your cloud data as RDF Resources

Since its all about semantic web 3.0 and RDF Data linking, I am going to explain about RDF data and exposing RDF data in the cloud space in 5 to 10 mins :) Just by using WSO2 Stratos Data Services Server.

The Resource Description Framework (RDF) is one of the most powerful technique to expose and interlink data(knowledge) in the decentralized world. It is also the latest trend in publishing and consuming linked data on the cloud therefore, lets discuss how we can expose our data as a RDF resource in the cloud using WSO2 Stratos Data Services Server.

1) use the RDF data model to publish structured data on the Web

RDF data model consist of set of statements which has a way of publishing link data on the web as triplets (with the use of subject predicate and object). In simple terms RDF model is a way of representing machine understandable data on the web as shown in the diagram below.

2. use RDF links to interlink data from different data sources
All things described by RDF are called resources, RDF links represents the linkage between one resource to another which is mainly done by the use of URIs.

-------------------Simple RDF file --------------
<rdf:RDF xmlns:rdf="http://www.w3.org/1999/02/22-rdf-syntax-ns# xmlns:cd="http://www.product.fake/cd#">
<rdf:Description rdf:about="http://www.product.fake/cd/S10_1678 ">
<cd:productCode>S10_1678</cd:productCode>
<cd:productName>1969 Harley Davidson Ultimate Chopper</cd:productName>
<cd:productLine>Motorcycles</cd:productLine>
<cd:quantityInStock>7933</cd:quantityInStock>
<cd:buyPrice>48.81</cd:buyPrice>
</rdf:Description>
</rdf:RDF>

Now that we have a brief understanding on RDF and the importance of RDF data, lets see how we can generate RDF data source from a Google spread sheet.

First you need to create a google spread sheet of your choice which has some sensible information. To get the full usage of RDF you need to create several rdf

resource for the linking purposes however, for clarity purposes I will demonstrate how to create a single RDF resource and link it with an existing RDF resources.

Lets expose a google spreadsheet with product information on vehicle sales.


    Product – Describe the currently available products in a car sale vendor.

    IDModelClassificationQty
    S10_16781996 Moto Guzzi 1100iMotorcycles12
    S10_19492003 Harley-Davidson Eagle Drag BikeClassic Cars23
    S10_20161972 Alfa Romeo GTAMotorcycles18
    S10_46981962 LanciaA Delta 16VMotorcycles15
    S10_47571968 Ford MustangClassic Cars13
    S10_49622001 Ferrari EnzoClassic Cars12
    S12_10991968 Ford MustangClassic Cars4
    S12_11082001 Ferrari EnzoClassic Cars10


Lets assume we have another set of RDF resources on product line ( which has information on each product line type) ie http://productLines/car , http://productLines/cycle, http://productLines/bus

Now lets create a data service to expose our Spreadsheet data as a rdf resource. In order to expose these data in the cloud you need to have a stratoslive account. Once
you create your stratos live account you can access set of stratos services such as Enterprise Service Bus, Application Server, Data Services etc (to try out stratos services you can easily create a demo account for free )

After creating your stratos account you can easily logged into your tenant domain and start working in the cloud!!!!
Now lets go back to exposing spreadsheet data as a service ... In order to do that we need to use WSO2 Stratos Data Services Server which provides a
powerful set of feature to expose data as a service and set of service utility methods. To access data services go to stratos live manager home page and click on wso2 stratos Data services.

To create a data service go to the left side menu bar and click on create under webservices->Add->Data Services. Then you will get a wizard as shown below. Give a proper data service name and click on next.


Once you click on next you will be directed to add data source page. And give information regarding the google spreadsheet you created along with your credentials


You can click on test connection to confirm your connection.

Click on next to go to the Query page. Query page describe the extracting algorithm to extract your data from the data source (google spreadsheet). Lets extract ProductID, Model,Classification and Qty.

Since our output is RDF result set, we need to specify our output type as RDF. RDF Base URI is the format of rdf:about URI which uniquely identifies each resource.

We will give RDF base URI as http://www.product/cd/{1}; this takes the Spreadsheet column 1(which is the ID) value for each row and replaces it for the RDF about attribute inside rdf:Description element

Output Type – RDF
RDF Base URI :- http://www.product/cd/{1}
Row namespace :- http://www.product/cd#

To generate the response in RDF format click on "Add New Output Mappings" button. There are two mapping types in RDF Output mapping. 1) as a element, 2) as a resource.When mapping an element as a resource, you need to give the resource URI along with the column name which needs to be mapped in curly brackets as shown below. This way we can link two RDF resources together and create a relationship between each other.

Lets map ID, Model and Qty as elements and Classification as a resouce, Lets link classification column to the productline resouces as i mention earlier ( http://productLines/car , http://productLines/cycle, http://productLines/bus )

Mappings of RDF resource

Resource URI http://productLines/{3} (as you can see we put the column 3 to get each classification type of the product).

Resouce Field Name - Classification

Mappings of RDF element

Following diagram shows the output mappings which we mapped from google spreadsheet to RDF resource.

Once we create the the query click on next to add Resources. Since we are exposing data as RDF resource we need to create a resource to expose the data. Lets give our query information when creating the resource.


Resouce Path – Products
Resource Method – Get
Query ID – RDFQuery

Click on finish to deploy the data service. Once you click on finish you can see your deployed data service under service list as shown below.


Now that we created our RDF resource we can test it by accessing it as a rest call or by using the try its feature.

Rest URL https://data.stratoslive.wso2.com/services/t/amani123.com/RDFDataSource/_getproducts (replace the tenant name amani123.com with your tenant domain)

You can validate this RDF resource by using the online RDF validator by copy pasting the rdf resource (right click on the page and view page source copy paste it inside the validation)

Now we exposed our spreadsheet data in the cloud space just within 10 mins :) you can create more rdf data sources using the same manner with different data sources (csv/excel/rdbms) and expose those data as RDF data sources. I will further explain how we can extract RDF data using SPARQL in my next blog post :)

Thursday, September 22, 2011

Extracting Web information using WSO2 Data Services

This blog explain how to scrape web data using wso2 data services web harvesting feature. In this tutorial I am going to extract Top rated books from Top Rated Books - Book Movement web page along with their authors and expose those data as a data service.

Before I begin lets look at how scraping works.

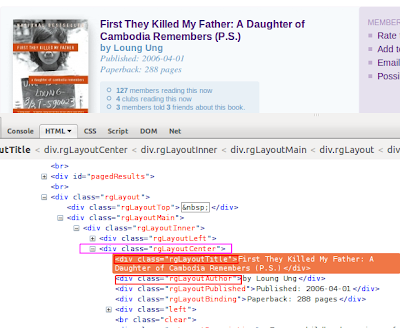
When you scrape a web page you need to identify the html/xml pattern. If we look at Top Rated Books - Book Movement page you can see list of books are listed along with their details. Now if we look at the page source we can see several html tags are repeated in the same manner.


If you look at it closely you can see a wrapper element which is

<div class=”rgLayoutCenter”>

and inside that wrapper element you have some thing like this.

<div class="rgLayoutTitle">First They Killed My Father: A Daughter of Cambodia Remembers (P.S.)</div>  

<div class="rgLayoutAuthor">by Loung Ung</div>

Now our basic requirement is to extract all the books along with their authors. To do that we need to find the pattern of the book title as wel as the author.

<div class="rgLayoutTitle">First They Killed My Father: A Daughter of Cambodia Remembers (P.S.)</div>  

<div class="rgLayoutAuthor">by Loung Ung</div>

we can easily write an xslt template to extract these information

<?xml version="1.0" encoding="ISO-8859-1"?>

<xsl:stylesheet version="1.0" xmlns:xsl="http://www.w3.org/1999/XSL/Transform">

<xsl:output method="xml" omit-xml-declaration="yes" indent="yes"/>

<xsl:template match="/">

<BookInfo>

<xsl:for-each select="//div[@class='rgLayoutCenter']">

<Book>

<Title><xsl:value-of select="div[@class='rgLayoutTitle']"/></Title>

<Author><xsl:value-of select="div[@class='rgLayoutAuthor']"/></Author>

</Book>

</xsl:for-each>

</BookInfo>

</xsl:template>

</xsl:stylesheet>

Above xslt template describe to go inside each

<div class=”rgLayoutCenter”> 
element and extract value of
<div class="rgLayoutTitle">
and
<div class="rgLayoutAuthor">
and assign it to the XML elements Title and Author inside the wrapper Book element.

Creating the web harvest data service

Now we learnt the basic concepts on web scraping/web harvesting, we will straight away create the data services using WSO2 Data services server.

To install WSO2 data services download and unzip the zip file and go to $DS_HOME/bin and start up the server from the command prompt, run bin/wso2server.bat{sh}


When the server startup is complete, access http://localhost:9443/carbon in your browser. Sign in to the server using the default credentials (username=admin, password=admin) in the right hand side corner. It will redirect you to the management console page.

To create the data service click on create in the left hand side menu under Web Services -> Add -> Create

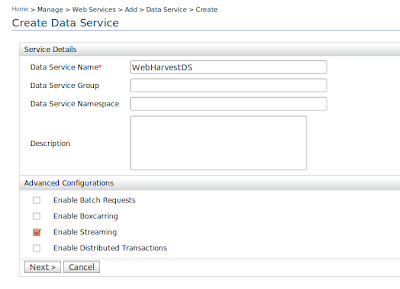
Once you click on it you will have to fill the data service information as shown below. Lets name our data service as WebHarvestDS.


Once you click on next you will be redirected to create data-source page click on add new datasource to add our web datasource.

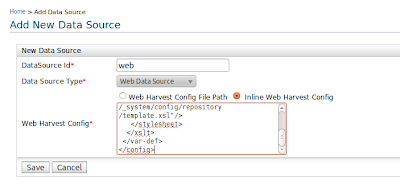
For the web datasource you need to have a configuration file along with the web scraping url, the scraperVariable and the HTTP method to extract data.

Also we need to provide our template.xslt file location we wrote earlier.

<?xml version="1.0" encoding="UTF-8"?>

<config>

<var-def name='bookInfo'>

<xslt>

<xml>

<html-to-xml>

<http method='get' url='http://www.bookmovement.com/app/readingguide/memberRecommendations.php'/>

</html-to-xml>

</xml>

<stylesheet>

<file path="/media/ntfs/web/template.xsl"/>

</stylesheet>

</xslt>

</var-def>

</config>

Place the above configuration file inside the inline configuration section (or you can save the above configuration in your local machine and give it as a web harvest config file path)

Lets give our scraper variable as bookInfo and HTTP method as get and also our template location.


Creating the Query

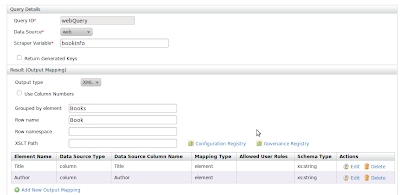
Click on next to add a query. Give a queryId, scraper variable as webQuery and bookInfo.

To populate the data properly we need to give the group by element and row-name. This is to tell the web service how our result format should be. We also need to give output mapping to arrange our extracted data.

Query information.

  • QueryId – webQuery
  • Data Source – web
  • Scraper Variable-bookInfo
  • Grouped by element – Books
  • Row name – Book

output mappings

  • Element – Title
  • Element – Author


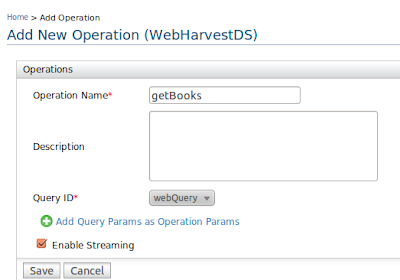
Click on Next to add operation and select the query name and give a name to our operation.


Click on finish to finish creating the data service. Go to webservices list and you can see our webservice is successfully deployed.


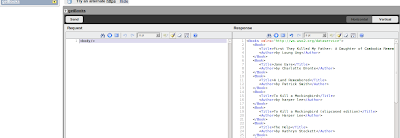
You can invoke the service using the try-it tool.


You can also invoke the data service using a rest call by simply typing http://localhost:9763/services/WebScraping/getBooks/ on ur browser.

Saturday, September 17, 2011

Kick start on WSO2 Stratoslive


Since we are going to see lots and lots of WSO2 Stratos related demonstrations and tutorials and powerful capabilities of cloud computing and stratos, its very important to know how to get started in WSO2 Stratos .

Getting started easy!!! all you need to do is create a StratosLive account (which is TOTALY FREE) and you can start using wso2 stratos live services right away.

Lets see how we can create a stratoslive account.
First go to the stratoslive homepage.
   

To create a new account click on “Get Started Now for Free! ” . It will redirect to a page where you need to give your Domain Information, Usage plan Information, and Contact Details.


To created a domain (a user account/ tenant) you need to give a unique tenant domuain. You can test
the uniqueness of your domain by clicking “check availability” button.
Once you give your domain name you need to select the usage plan for your domain ... there are four types of usage plans you can click on pricing details to get ll be allocated for you. For exploring StratosLive features and understanding the power of cloud computing you can select the demo version (Which is the free version).
After that you need to give your contact details for the registration purposes. Give your personal information along with your tenant-admin user name password and the verification code.
Once everything is filled properly submit the document and you will be redirected to a success page.


To activate your tenant/domain you will get a email with infomation on how you can activate your account. Once you activate you can login to your account simply by giving the username@tenantdomain and the tenant admin password you gave while registering your tenant.

When you login it will redirect to Stratos Manager home page which has all the links to StratosLive services.

To get more information regarding these services click on help it will give a brief description about each service.


To try out services by clicking on each service and have fun with cloud computing!!


Friday, September 2, 2011

Expose your databases as a service in two steps!!!


WSO2-Data Services Server provides the feature to expose your data as a service right away!!!. All you need to give is your database information and then generate data services to expose your database tables/schemas as per your need.

If you are using wso2 products for the first time ...

You need to download wso2 dataservices server.
Start up the server -> go to DS_HOME/bin/wso2server.bat | wso2server.sh (DS_HOME is where your set up is located)
Once the server is up and running open a web browser and navigate to https://localhost:9443/carbon.
Login it the server using the default credentials (username=admin, password=admin).

Also note that you need to provide the related jdbc driver for the database and put in repository/component/lib in order for this feature to work.

Step 1 :- Create a data source

In order to expose your database you need to create a data source using wso2 data services server.
To create data source click on Configure -> Data Sources


Click on add data source and give your data base information.


Once you create your data source you can test your connection by giving a validation query (ie Select 1) to make sure your connection is successful.

Step 2 Generating data services

You can start by clicking on the generate link in the main menue. Once you click on generate you will be directed to a wizard which will ask for the datasource and the database name which will be needed to expose.

Once you create you give your database name you will get the list of schemas/tables to select for your data service.


Once you select the tables of your choice then you need to decide wether you need a single service for each table or multiple services per table.

Click on next to view the created data services
Click on finish to view the deployed services.
You can try your service by clicking on try this sample for database transactions :) You can also generate axis2 clients by clicking on the data service.
Try your service


Wednesday, January 26, 2011

ChordATune and HMM (Interactive AI Systems)


Hidden Markov Model is an AI System and also a statistical probabilistic model in which the state of the process is described by a single discrete random variable. HMMs can model to determine hidden parameters from the observable data. In HMM if the current state only depends on the previous state it is known as a first
order Hidden Markov model .
ChordATune can be modeled as a first order Hidden Markov Model, the observable data can be modeled as melody notes (pitch classes) and hidden parameters which are also known as hidden states can be modeled as chords. HMM determine the hidden state sequence (Chords) when the observable sequence is given. In western music theory we know a chord progression solemnly depends on its previous chord therefore, this system can be modeled as a first order Hidden Markov Model.


Definition: A variant of a finite state machine having a set of states , Q, an observation (output), O, transition probabilities, A, Observation probabilities, B, and initial state probabilities, Π. The current state is not observable. Instead, each state produces an output with a certain probability (B). Usually the states, Q, and outputs, O, are understood, so an HMM is said to be a triple, (A, B, Π)
Elements of HMM
  • Q – States
  • O – Observation
  • A – the state-transition probability matrix
  • B – Observation probability distribution Matrix:
  • p - Initial state distribution probability
  • λ – the entire model
Following elements are further elaborated and mapped according to ChordATune system as described below.


Hidden States –Hidden states are the chords which can be applied for a given melody. ChordATune system is designed to use only for 24 types of chords due to the scalability and the complexity (12 Major chords and 12 Minor chords) therefore, this HMM has 24 possible hidden states.
Transition Probability Matrix (A) - This holds the probabilities of possible transition from one state to another. Therefore, probability of transferring from one chord to another chord is calculated by analyzing the training data.
Observations – Observations are the set of pitch classes which belongs to a given Chord. Since melody notes can have many combinations defining set of static observations can be a complex scenario and it cannot be defined statically. Therefore, a matrix called pitch class chroma vector is used to manipulate the observations. Pitch chroma vector matrix is 12X24 (12 pitch classes and 24 states-because of the 24 chord selection) is a pitch histogram for 24 chords and probability of occurring notes per a given chord. This is calculated by calculating the probabilistic occurrence of pitch notes along with its beat for a static duration. Then mapping it with the related chord so the notes which related to each chord and there beats can be calculated by the chroma vector matrix. The observations and the observation matrix are calculated by calculating the degree of relevance between pitch chroma vector and the input melody so that observations for each hidden states can be defined. The algorithms which are used to calculate this chroma vector and the calculation of observation probability matrix.
Initial state distribution is the initial probability of occurrence for a single state at a time. This can be modeled as the probability of occurring the initial chords (start chord). This can be calculated by analyzing the training data and calculating the initial probability of each chord.
Transition probability matrix holds the probabilities of transferring one chord to another. In order to incorporate the emotional factor to the system two different transition probability matrices are maintained: Major Transition Probability matrix for happy songs and Minor Transition Probability matrix for sad songs. According to the emotional factor of the given input melody, a combination of these transition matrixes is taken as shown in the following calculation.
Aij = P (Chordi /Chordi-1)

Aij = αAmajij X (1-α)Aminij
α – Emotional Factor
A – Transition Probability Matrix

Observation probability Matrix is populated using the input melody and the pitch class probability matrix. The pitch class probability matrix is a 12X24 matrix which has the probabilities of occurrence of each pitch classes for a given chord.
Bij= P (MelodyBar / Chord) Dij

(D – Pitch Class Vector)

Initial state distribution probability is the initial probability of occurrence for a single state at a time. Data driven and heuristic driven approaches are followed in order to train the model. Initial state distribution probability matrix and major minor clustering for Transition probabilities are trained using the heuristic driven approach. Transition probability matrix and pitch class probability matrix are trained using the data driven approaches. Around 250 lead sheets are used to train the ChordATune system, each of these lead sheets have monophonic melodies associated with relevant chord progression. Once the melody is processed and HMM properties are initialized according to the given melody and the emotional factor, chord progression is generated using the Viterbi algorithm.

Tuesday, January 25, 2011

Wednesday, November 24, 2010

Create Your Own Music Using ChordATune

ChordATune is a music making software where users can create their own creative music and mabe use them to create birthday cards, home made videos, play it using your guitar .. and many more. ChordATune also allows you to harmonize a known song and find their accompaniments.
In this section I will give you a step by step guide on how you can create music using ChordATune .

1. Creating a song.

There are several ways to create melodies in ChordATune.
  1. Using an existing midi file (if you have an already exsisting melody and don't know how to get the base chords) ..
  2. Using a manuscript Editor - ChordATune provides a well known tools to create manuscript notations (if you know your music theory)
  3. Using a virtual Piano.
I will explain how you can create your own melodies using the virtual piano provided by ChordATune

In the main frame of ChordATune, under creation mode select piano from the drop down list and click on create a song.

Then you will get a virtual piano as shown below ..


Here you can click on the key board and create your melody once you create the melody you can click on play to listen to your creation. If you don't like the sound of it you can click on edit and delete the unnecessary notes. If you don't like the entire melody you can click on clear and start over. To view your melody in a manuscript notation click on view. Once you are done click on save to save your creation. :)


2. Generating the harmony

Now that you have a melody you need to generate the harmony (base chords) to accompany you melody. In order to harmonize you need to follow the following steps
  1. Select the time signature (in simple terms its the beat of your melody)
  2. Input the midi file (the melody you just created) - you can listen to the melody once u input the melody
  3. Giving the emotional factor (harmony depends on user emotions therefore its important to specify what kind of song you want ie a happy song, sad song ect (if you don't like a particular harmony generated by ChordATune you can always change the emotional factor and get a complete different harmony.
  4. Generate Harmony

3 . Display Harmony

Once you generate the harmony there are several options to display the harmony.

  1. Selecting the genre - You can select the genre(style) of your choice while displaying the harmony. There are several styles allowed in ChordATune. (ie Rhumba, Swing, Disco, Rock, March)
  2. Selecting the drum beat - According to the genre users can select different drum beats)
  3. Changing the tempo - if you want to change your tempo of your song you can change the tempo using this functionality
  4. Display the harmony


Now you know how to create a simple song using ChordATune. It is advice to give different variations and experiment with your creation by choosing different emotional factors/ changing the genre/drum beat and tempo to get the best result of your choice. This way you can add your own creativity to your song.


ChordATune also allows you to generate the guitar tabs (fingering positions of guitar chords) for you melody for the guitar players :) by selecting the display style as guitar.


ChordATune also allows you to print your music as sheet music by clicking display printable version.


Now you can go to your piano/guiatar and play your music !!!